Showing posts with label Thanksgiving. Show all posts

Thankgiving Slider Card

It's Friday!  And that means it's time for another Cardz TV Challenge.  This week the 3D Designers are up and this week our challenge was to create a 3D card for Thanksgiving.
 
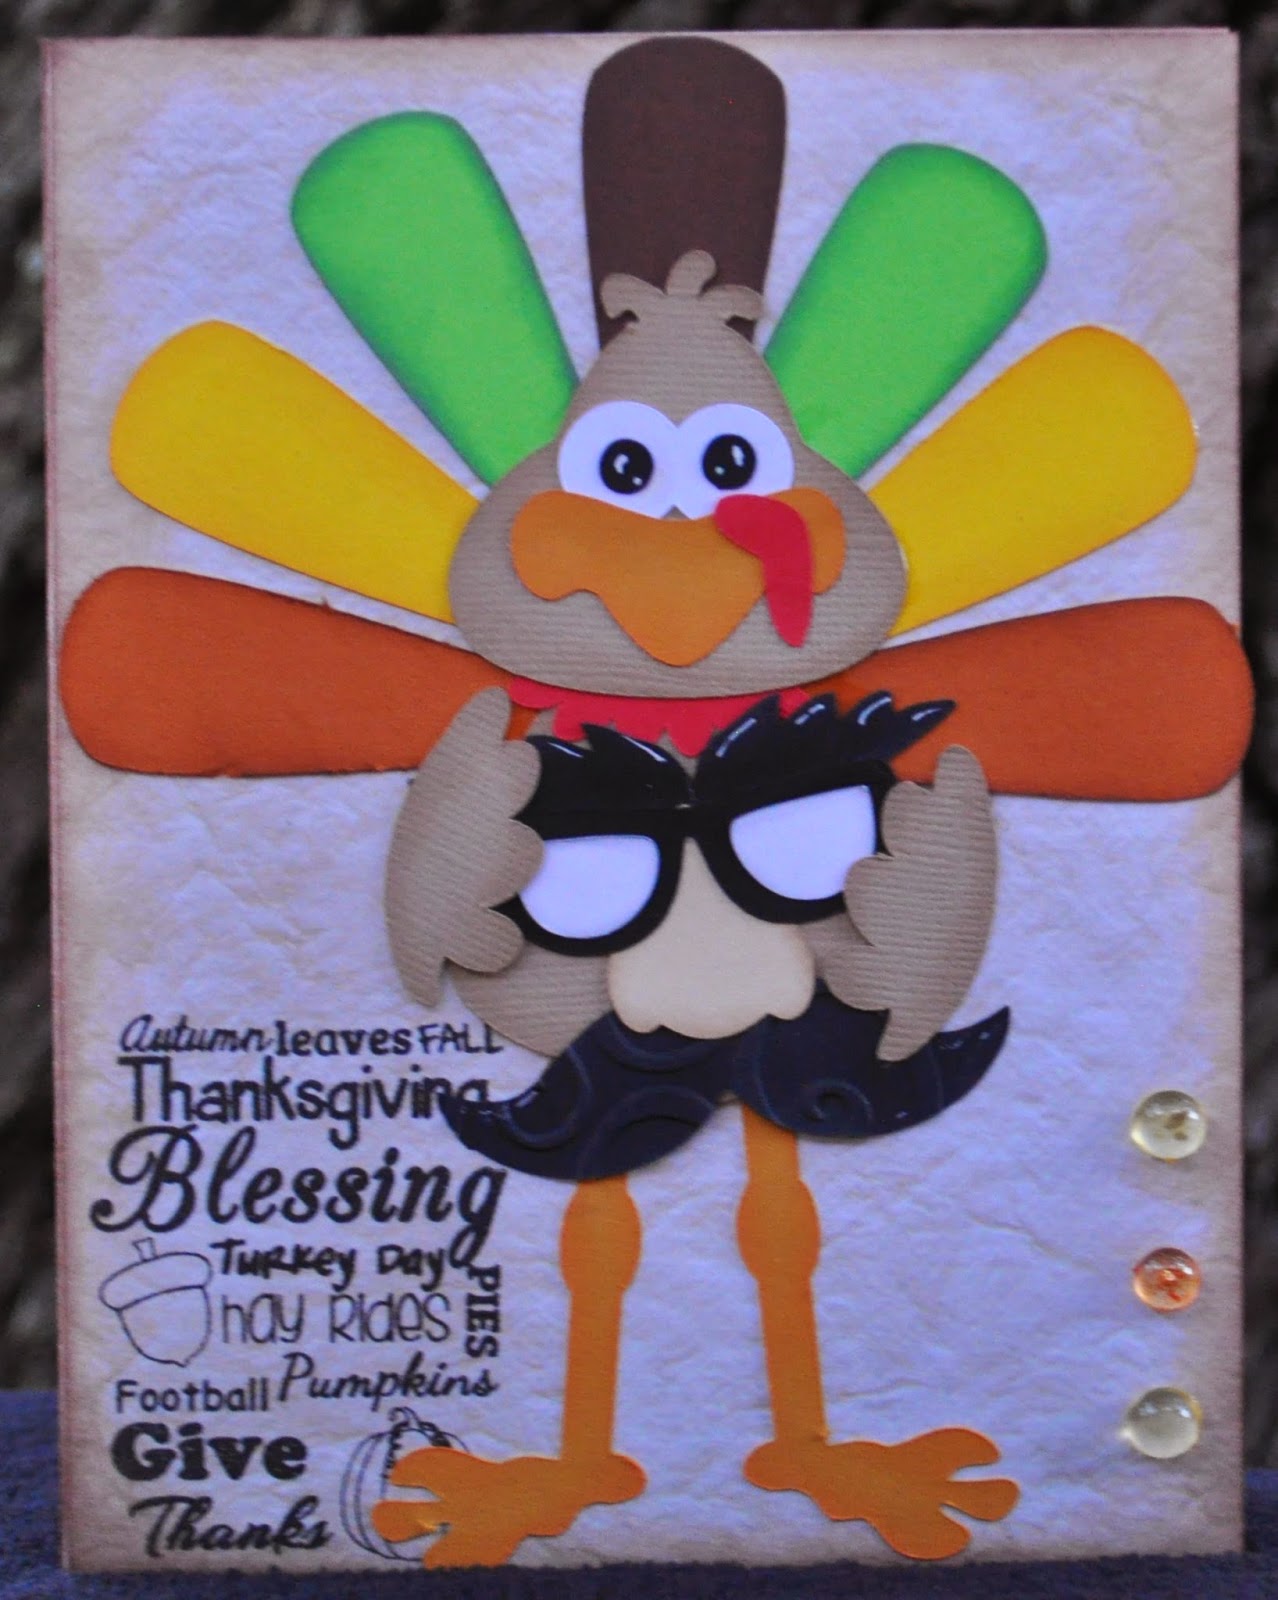
For my card I decided to try my hand at making my first ever slider card.  While not 3D without the slider pulled it does become 3D when it is and so I followed that thought process and created my card.  In addition to the slider itself the card is also a regular folded card so it does have an inside as well giving yet another dimension when opened. 
 
I used the Turkey Slider Card from the Silhouette Design Store (Design ID #100178) to create my card.  Then using a combination of papers from my DCWV House Harvest mat stack I put it all together.
 
The stamped sentiment is from the Cardz TV Stamps set titled Happy Days.  I also added some skittles using one of each of the following colors: Rudolph Red, Willow, and Sunset Orange.
 
And now that you've seen my take on this week's challenge be sure to pop on over to Cardz TV and check out the other wonderful designs our team created for you. Then create a 3D card of your own, link up and play along with us.  You have two weeks (until Thanksgiving Day) to play along.

Now I'm going to enter my card into a couple of challenges:

Thank you or Thanksgiving - DoubleClick Connections - Ends November 24

Thanksgiving - DL Art - Ends November 25th

Bad A$$ Turkey

Today I have a card to share with you that uses a wonderful file I came across over at Treasure Box Designs.  The name of the file is Pardon Me, and I love how this turkey is disguising himself his hunter's cap and a set of antlers.  And the fact that he's holding a rifle just cracks me up.  I love it.
 
When I was preparing the pieces to put him together I decided to emboss the feathers using one of my script folders.
 
The sentiment I used is from the Jaded Blossom stamp set titled Sassy Pants.

Autumn Greetings

Can you believe it's the beginning of another week?  I don't know about you but my weekends seem to just fly by anymore.  And how about the fact that we are just 10 weeks (and a couple days) away from Christmas and 6 weeks from Thanksgiving?
 
Speaking of Thanksgiving I have a fun card that I'd like to share with you today.  I created my card using this hoot-iful turkey from the Thanksgiving Hoots file from Marjorie Ann Designs. 
 
My sentiment is from the Hey Pumpkin stamp set from Craftin Desert Divas.
 
And now I'm off to enter my card into the following challenges:
 
Hiding in My Craft Room - Super Scraps Saturday -  Ends October 17th
 
DL Art - October Linky Challenge - Ends October 31st

Oh Snap Donald

Before we get started, PDE Linky Party is looking for a couple of Guest Designers!


Would you be interested?


If so just put GD after your name on your
linky party submission when you link up to play along this week.


ANY type of crafting is welcome! Stamping or Die Cutting, etc.  PDE Linky Party is looking for a Guest Designer for the following dates to finish out this year:


Dec 16 - North Pole theme
Dec 23 - Anything Goes
Dec 30 - Celebrate (birthday or new baby or congrats for anything)

Make sure these dates will suit your calendar, because Janis will randomly assign the Guest Designers to one of these dates. You will not be able to pick the date you want. 

And now on to this week's PDE Linky Party challenge.  This week we are challenging you to create a project featuring Pilgrims, Indians or Turkeys.  As you can see I've decided to use a turkey for my project.
 
This great gem of an SVG came from a recent Disney Holidays blog hop sponsored by SVG Cutting Files.  I saw this great file of the turkey hiding in plain sight from Donald and I just busted out laughing.  I mean come on, it doesn't get much better than that.
 
And since I still do not have any Thanksgiving themed stamps I had to find something that would work with this great cut.  I had a couple picked up and asked my wonderful husband what he thought (as I often do) and this is the one we settled on.  It's from the Craftin Desert Divas stamp set titled Capture the Good Times.
 
And now that you've seen my project for the PDE Linky Party be sure to check out the other great designs our team has come up with for you.  Then create your own link up and play along with us.
 
I can't wait to see what you create.

Until then I am entering my card in the following challenge:

Give Thanks - SVG Cutting Files - Ends December 14th

Thanksgiving - Die Cuttin Divas - Ends November 24th 

Turkey Time - My Sheri Crafts - Ends November 21st

Think Fall - Hiding in My Craft Room - Ends November 22nd


Let's Talk Turkey

Before I begin today's post I'd like to take this opportunity to thank all of our Veteran's - currently serving and retired - for their service and sacrifice.  Coming from a military I know what you and your families go through and YOU GUYS ROCK!
 
Now let's talk turkey.  Today I am a guest designer for the Die Cuttin Divas and this week's challenge is all about the turkey.    Create a project - card, layout, treat holder - whatever you want, but include a turkey on it and come play along.
 
But first let me share with you how I created my card.  My ever so cute turkey with his disguise is an SVG file that I purchased from Designs on Cloud 9.  The file is titled Turkey Time.  This was a super quick and easy to put together piecing and I couldn't be more thrilled with the way he turned out.
 
My stamped sentiment is from the Craftin Desert Divas stamp set Simply Holidays Wordart.
 
To finish off my card I used some skittles (yellow and pumpkin pureness) from DoubleClick Connections.
 
And now that you've seen my take on this week's challenge be sure to check out the wonderful designs that the Die Cuttin Divas put together to share with you.  Then create your own project, link up and play along.

And I am entering this cutie in the following challenges:

Turkey Time - My Sheri Crafts - Ends November 21st

Anything Goes - DL Art - Ends November 30th

Turkey Treat Holder

Wow, we're just a little over two weeks away from Thanksgiving and all the goodies it brings.  That is also the week of my birthday so be looking for something fun that will include blog candy/prizes.
 
For today's project though I wanted to make a treat holder.  And what better to use for a treat holder than one of the great files over at SVG Cutting Files.   This time I chose the Turkey with triple treat holder.  He was a lot of fun and very easy to put together.  I decide though that I wanted his eyes to be a little bit bigger and stand out more so I added a couple of charcoal gems for his eyes.
 
As I was going through my stamps I noticed that for all the Jaded Blossom stamps I own I don't have any Thanksgiving themed ones.  (Guess I'll have to get that rectified here pretty soon.)  I did; however, still used a Jaded Blossom stamp for my sign.  This one is from the Super Hero stamp set.
 
With that I am off to enter my treat holder in to the following challenges:
 
Let's Make a Treat - SVG Cutting Files - Ends November 14th
 
Thanksgiving or Thankful/Thank You Theme - Jaded Blossom - Ends November 22nd
 
Anything Goes - DL Art - Ends November 30th

Give Thanks - Little Scrap Pieces - Ends November 14th
 
Sparkle and/or Shine - Moving Along with the Times - Ends November 12th (eyes & the candy are my sparkle for this one)

Turkey Time - My Sheri Crafts - Ends November 21st

Counting My Blessings

Happy Friday and welcome to another Cardz TV  challenge.  This week we are giving thanks.  Create a Thank You card for Thanksgiving......
 
Remember that Thankful Wishes file I told you about earlier this week?  The one from Treasure Box Designs?  Well today's card features yet another cut from that great file.  This time it's one of the turkeys holding his wishbone.
 
Isn't he just the cutest thing?  I wanted to add lots of color to this little fella so I scavenged through my scraps stash and found some great left overs that I thought worked perfectly.
 
As for my thankfulness - well every time I count my blessings, regardless of what they are I am being thankful.  This stamped sentiment is from the Count Your Blessings stamp set from Cardz TV Stamps. 
 
I count my blessings that Mary has allowed me to be a part of her crafting team for five years now.  Wow can you believe that?  That's a long time for her to put up with me.  LOL  And if you're curious you can view my first official DT challenge post here.  This was back in the day when we were called Cricut Cardz Challenge.
 
But now that I've shared my card and walk down memory lane, be sure to check out the other fabulous designs our team has created for you this week.  Then create your own card, link up and play along with us. 
 
I can't wait to see what you create.  In the meantime, I am off to enter this card in to the following other challenges

Anything Goes - DL Art - Ends November 30th

Fall Colors - Hiding in My Craft Room - Ends November 8th

Marley & Me (use an animal) - Red Carpet Studios - Ends November 15th

Gobble Gobble

 
Welcome to another Skittles Challenge.  For this challenge we are working with polka dots or circles.  As you can see though I chose to play with both.
 
I found this wonderful Thanksgiving file called Thankful Wishes over at Treasure Box Designs and immediately fell in love with it.  That turkey upside down in the pot pie caught my eye and that was all it took.  Combine that with this wonderful Lil Tweets Thanksgiving stamp set from Peach Keen Stamps and you're half way there.
 
To finish off my card I used some scraps from a couple of different Fall Themed mat stacks I have.  Both stacks are from DCWV and came out last year.  Then I used a small scrap from my stash and punched out the two circles where I placed my caramel skittles from DoubleClick Connections.
 
And now that you've seen my take on the bi-weekly challenge be sure to check out the other designs our team have put together just for you.  Then create your own, link up and play along for your chance to win a fun prize.  The challenge ends November 11th so you still have plenty of time to come play along.

Now I am going to enter this card into the following challenges:

Photo Inspiration/Thankful - Peachy Keen Stamps - Ends November 13th

Anything Goes - DL Art - Ends November 30th

Fall Colors - Hiding in My Craft Room - Ends November 8th

Beary Thankful

Can you believe it's time for another Skittles challenge over at DoubleClick Connections?  My how the time flies when you're having fun.  The theme for our new challenge is Animals.  Create a project using any animal you would like.  Link it up, play along, have some fun with us and have a chance to win some free skittles and other crafty goodies.
 
For my project I used this adorable Autumn bear I found a while back at Kadoodle Bug Designs.  She has the most adorable bear files and this one was definitely no exception.  I cut him out at 3.69 inches tall and that gave me the perfect size to create this card using a sketch that was the canvas for a recent challenge at Peachy Keen Stamps.  I love the versatility this sketch offers and I'm keeping it in my arsenal.
 
The stamped sentiment is from the Beary Sentimental stamp set by Maymay Made It.  I don't think this particular set is still in production but she does have some other cute sets available.
 
The skittles I used on my card are from the recent summer release.  There are three different colors:  Caramel, Grinch Green, and Purple.  
Yummy Skittles
Not sure what skittles are, how to use them or if you would use them?  Check out this page
here.  You can even find more inspiration by visiting my Crafting with Skittles Board over on Pintrest.
 
But first be sure to check out the other projects that our design team has put together for you.  Then after you taken in all the inspiration be sure to craft along and link up your animal project.  I can't wait to see what you create.

Three Rules for A Happy Thanksgiving

You know those Chic fil A commercials where the cows encourage you to eat more chicken?  Well today I want to share a card that I made back when I first got in to paper crafting.  Instead of cows though we have a disguised turkey encouraging us to eat anything but turkey for Thanksgiving. 
 
I had a lot of fun creating this card and since it's been a while I think it's one that I'll need to see about recreating and updating.  Now to find the time to do that.......
 
In the meantime though, here's what I used for this one.
 
Animal Kingdom for the Turkey - cut at 3 3/4"
PPDU for the hat and collar - both scaled to the sizes I needed to fit my turkey
Everyday PPD for the glasses - also scaled to the size needed
George - to create the sign, I used two of the shapes and welded them together
George for the numbers - cut at 3/4"
 
And for a little added fun this Thanksgiving check out the projects the design team made over at Hiding in my Craft Room.  They're cute, cute, cute, and I think I'll play along with them.

Child Friendly Thanksgiving Place Setting

I originally created this project back in 2010 but wanted to share this with you as we draw near to Thanksgiving this week.  Plus I noticed that my original post referenced the instructions being in a newsletter that is no longer available.......
 
Of course I can't take credit for this idea as it was based on inspiration I received from Scrapbooks, etc magazine.  In the article it showed great ideas for setting the table for the holiday and one of those ideas was a paper pieced turkey as a crayon holder.  Immediately the lights went on and I thought what a great idea - now let's expand it and that's just what I did.  So without further delay here are the instructions......


Child Friendly Thanksgiving Table Setting
Supplies Needed:

8 count box of crayons
Rubber band & piece of string/ribbon
1 ½ sheets Fall themed paper    
8 ½ x 11” sheet of white or off-white paper
Cricut ink pen
Design Studio or Gypsy
 
Cricut cartridges:  I used Thanksgiving, Create a Critter, A Child’s Year, PPDU and Animal Kingdom, TBBM

To Create Placemat:

1.       Using the guidelines provided in Design Studio or Gypsy place a variety of Thanksgiving related cuts on the mat staying within an 8” x 11” area. 


2.       Replace the Cricut blade with one of the ink pens and print the images.  Ink edges.


3.       Cut a 12” square paper to 9 ½” x 12”.  Adhere the white page to printed page.  Ink edges.


To Create Personalized Silverware Pocket:


1.     From TBBM cut one of the tag pockets in blackout (and no hole) at 11 ½”.  See pages 112& 113 of the handbook.


2.     If your paper is not a double print place your paper print down on the mat before cutting.  This will keep your print on the outside of the pocket when folding and putting together.


3.     Create name tag by cutting a pumpkin from Create a Critter at 1 ¾”.  Hide the facial contours to allow for writing the child’s name on the tag.


4.       Adhere tag to pocket.


To Create Crayon Holder:
 
1.       Using Create a Critter cut the turkey and needed layers at 2 ½”.  Ink edges.


2.       Build the layers for your turkey EXCEPT for the very back tail piece.


3.       Prick two small holes in the center of the very back tail piece.  Tie rubber band to the tail.


4.       Adhere tail piece to the turkey to complete build.


5.       Add crayons by wrapping rubber band around them to hold them in place.


 Note: Crayon holder was scraplifted from the December 2010 issue of Scrapbooks, etc.

Colors of Fall - Gobble, Gobble


Happy Friday everyone and welcome to our Colors of Fall challenge over at Cardz TV.  This week our Go to Galz made cards, layouts and other projects featuring the colors of Fall:  red, orange, gold, brown and purple.

For my project I decided to alter a charger plate for some Thanksgiving style home décor.  It doesn't show up very well in the picture but the charger plate is purple and my gobble, gobble is cut from a lighter purple metallic paper.

My turkey and the gobble, gobble are both from Create a Critter.

The stamped sentiment is from the Cardz TV Stamps set "Happy Days".

And now that you've seen my project be sure to check out the other awesome ones created by our team.  Then after you've been amply inspired, create your own, link up and play along with us.

I can't wait to see what you create. 

Attitude of Gratitude Challenge

Happy Wednesday everyone and welcome to another Cricut Cardz Challenge.  This week we are making Thanksgiving cards with any cartridges/colors we want...........
 
..........and since I loved the way this one turned out years ago when I made it I decided to do a little re-make.  Don't you ever feel like doing that sometimes?  That's why I tend to save all of my cut files - I have 100's of them sitting in my folders and every so often when my brain is stumped for a design I reach in to my old bag and do a re-make.
 
So for this card I used the Designer's Calendar for all of my cuts.  I created the calendar using Microsoft Word (tables and word art can be great things lol).  Put them together and you get this wonderful little Thanksgiving card.
 
And now that you've seen my design for this week's challenge be sure to hop on over to Cardz TV to check out all of the other awesome projects our team created for you this week.  Then create your own, link up and play along with us........C'mon, you know you want to.

It's All About the Bears - Day 2

Happy Sunday everyone.  I hope that extra hour of sleep has found you well rested today because we are on day 2 of our Teddy Bear Parade Blog Hop.  So if you having begun your jouney with my blog, please take a moment to start at the beginning of our hop with Janis of Pause Dream Enjoy.
If you came here from Suzanne's blog, Zannie Berry you're in the right place! Before you begin please keep in mind that some of our Parade hoppers were affected by Hurricane Sandy and therefore are without power.  So if you land on a blog that does not showcase a project please come back here so you can move on to the next stop on the list.
 
For my Teddy Bear project I chose the turkey cut.  Now my original idea was to do a cute little card where the turkey is disguised and tells you to eat more pork, chicken and beef.  But as I started putting the card together I had one of those V8 moments because it finally dawned on me that this was a bear dressed like a turkey and not the other way around.  Talk about DUH!  So instead I opted for this beautiful Autumn paper as my cute little turkey's backdrop.
 
And now that you have checked out my project for this fabulous blog hop, your next stop along the Teddy Bear trail is with Sandra at 365 Days of Cricut.
And if you'd like to start at the beginning of our hop and go to the end OR  in case you get lost along the way here is out entire lineup:
 
DAY 1: Saturday, November 3rd
1. Janis ~ Pause Dream Enjoy
2. Lucy ~ Love to Create
5. Tara Barnes Bruening ~ Craftin Desert Diva's
6. Tracy Matos ~ Tracy's Cricut Corner
7.Sharon ~ Mee Mees Creations
8. Kathi ~ Kards By Kathi
9. Mary ~ Cardz TV
10.Michelle ~ Purple Monkey Moments
11. Elaine ~ Expressions by Elaine
DAY 2: Sunday, November 4th
1. Lucy ~ Love to Create
2. Michelle ~ Purple Monkey Moments
Suzanne - Zannie Berry
Barbara - Spot of Sanity - You're here
7. Sandra - 365 Days of Cricut
8. Cathy ~ Crafing with Mimi
9. Sharon ~ Mee Mees Creations
10. Julie ~ Cricut Chick
DAY 3: Monday, November 5th
1. Lucy ~ Love to Create
3. Melissa ~ Moe Creations
4. Gloria ~ Girlia's Cards
6. Robin L. ~ Create A Lattee
8. Rachelle ~ Creations by Rachelle
9. Sharon ~ Mee Mees Creations
10. Michelle ~ Purple Monkey Moments
 
 
So what are you waiting for?  Start hopping and enjoy your trip along the Teddy Bear Parade. 

But before you go, how about some blog candy?  Up for grabs is a pack of SEI die cut accents and brad pack from their desert springs line, a packet of various sundries from their field notes line and a chalk ink block.  All you have to do is leave a comment telling me one thing that you are thankful for as we approach Thanksgiving.  Comments must be received by midnight Monday as I will chose a winner using random.org and post the winner on Tuesday morning.  So be sure to check back here on Tuesday to see if you are the lucky winner.

Give Thanks - First Published Work

It has long since been a dream of mine to have one of my "works" published.  For a couple years now I have sent items in to a couple of magazines (like so many of you I'm sure) hoping upon hope that they would pick me to be published.  But month after month it was not meant to be........until one happy day last year when I received word that Cricut Magazine wanted to publish my submission in the November 2011 edition.

And now that the issue is over a month old I am able to share my submission with all of you.  For this projects I used:

A Child's Year for the fonts, cut at 1 1/2"
Accent Essentials for the scalloped shapes cut at 4 1/2", 5" and 6" all layered using pop dots
George for the circle cut at 8"
Thanksgiving for the corn cut at 3 1/2"

Oh, and guess what.  I just received word yesterday that another of my projects has been accepted for publication in the upcoming July issue...............

Count Your Blessings - Altered Charger

Isn't it funny how sometimes you figure out a new "trend" before it even becomes one?  Case in point, I decided about this time last year to try my hand at altering charger plates like the ones you get from Michaels, AC Moore or any other craft store.  And now it seems to be the rage - I even have one that's being published in the November issue of Cricut Magazine.....

Today though I want to share with you a redo of the first one I created last year.  I used the same cuts:

Thanksgiving for my verbiage (Count Your Blessings)
Christmas Noel (Solutions cartridge) for the Christmas tree and the star
George for the Circle cuts
Speaking of Winter for the snowman

So what's different about this plate and the one I did last year you ask?


This time I decided to add a couple of different glitters for added texture on my snow covered ground.
The tree once again has textured snow from my snow writer's pen.  I sprinkled a little snow glitter while damp and once it was dry I came back with a layer of glossy accents.


I also decided to add a sentiment to the backside of the plate.

So now that you've seen my altered plate I'd love to see what ideas you come up with.  In the meantime, I have another idea or two running around in my head.  Fortunately I have several plates that I bought on clearance after the holidays last year......


College Graduation Announcements

Sorry that I've been so quiet lately.  Things have been beyond crazy over here with getting ready for an upcoming graduation and a couple of craft shows.  We just tried our first time at the Oktoberfest and were pleased with the turnout.  Needless to say we'll do that show again next year.  But now it's all about getting ready for the big one next month.

All of that said, I completed the first half of my daughter's graduation announcements for this December.  We worked together to come up with a design and she decided on the verbiage.  This is the final result.  I posted them up on FB the other day and quite a few people loved the way they turned out  my daughter included....and that is of course a good thing.  lol

For these announcements I used:

Accent Essentials for the maroon & gold mats

Hello Kitty for the diploma

Locker Talk for the graduation cap; and

Thanksgiving for the "you're invited"

Count Your Blessings - Altered Plate

I created this altered plate for a Christmas gift this year.  A while back I had made a card with a similar theme and really loved the way it turned out so this time I decided to add to it and this time make it into a decorator plate.

For this project I used:

Thanksgiving for the font - cut in vinyl

Speaking of Winter for the snowmen and hats

Christmas Noel for the Christmas tree and star

George for the circle background

Child Friendly Thanksgiving Place Setting

Last month I picked up a copy of Scrapbooks, etc and saw an article spotlighting a variety of fun ways to set the dinner table for Thanksgiving.  One of them used a paper pieced turkey as a crayon holder.  Well immediately the lights went on and I thought what a great idea - now let's expand it.  So off I went, dusting off my Cricut markers and pulling out cartridges to find images that would work for creating this project.

And now that the November edition of the Wildly Whimsical Crafing Loft Newsletter has been published I can share it with you. 

For this project I used Thanksgiving, Create a Critter, A Child's Year, PPDU, TBBM and Animal Kingdom.  A list of other supplies used and complete instructions including cut sizes can be found in the newsletter.

Happy Gobble Gobble Day

While perusing through the current issue of CardMakers magazine I saw a fall card that inspired me so I lifted the "sketch" and created this one.

My card is 5 x 6 1/2 inches with the brown background mats cut at 3 1/2 x 4 inches and 3 1/2" square.  The colored mats were then cut 1/4" shorter, embossed and edges inked.

The scalloped ovals are from Accent Essentials cut at 3 1/2" but then I skewed the width to create an oval instead of the circle.  To create the top oval I cut and pasted the image and then skewed it to make it a 1/4" smaller than the background.

The turkey is from Create a Critter cut at 2 1/2".