A Hoppy Hello

Today I have an Easter card to share with you.  Only it doesn't really have to be an Easter card.  It could be a friendly stopping by to say hi card.  (insert smiley face)
 
I created this card using the Sweet Baby Bunny and the Ornate Card Base 3 files from SVG Cutting Files.
 
My background paper is from Creative Memories.  It's a customer gift set that I won in a blog challenge a while back.  This set is the Serene photo mats.  As you can see though I'm using it for something other than photos.
 
The stamped sentiment is from the recently released Funny Bunny stamp set from Jaded Blossom.
 
Thanks for stopping by, and now I'm off to enter my card into the following challenge:
 
SVG Cutting Files - Crafter's Choice - Ends March 14th

Hoppy Easter

 
For my first Easter card of the season I really wanted to use a new card sketch that I'd seen.  Then I thought this Juggling Eggs file from Marjorie Ann Designs would be perfect to use.  The file is a freebie for those who are members of the Free SVG's ~ Games & More Facebook page.
 
The papers that I used for this card are from a Creative Memories photo mat pack called Dreamy.  I won this and a couple of other packs from a challenge a while back and almost forgot that I had them. 
 
The stamped sentiment is from a discontinued stamp set by MayMay Made it called Mr. Big Ears.

And before I forget, here's the sketch that I followed for my card.  It's so easy and I have seen a lot of gorgeous cards using this sketch.


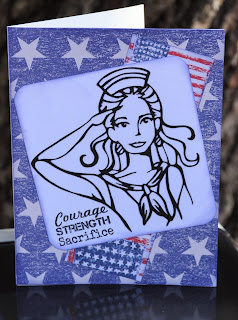
Courage, Strength, Sacrifice

 
Coming from a family full of both retired and active duty military showing support for those who serve is very important to me.  So when I came across the Homeland Heroes stamp set by Scrappy Moms I had to add it to my stash.
 
Then I came across this awesome Retro Sailor Girl file in the Silhouette Design Store.  This was created by Erin Doran and I was amazed with how beautifully this cut.  Not a single issue.
 
The background paper I used for my card is from the mat stack Proud to Serve from the Paper Studio.

First Car Layout

After a year of saving money, our young son purchased his first car a couple weeks ago.  It's a great car and has a lot of features that really surprised us.  Needless to say he was one happy boy.  And I've been a happy mom in that he has not been out running the roads given his new found freedom.
 
So to commemorate this milestone in our son's life I decided to scrap about it in his smash book.  Knowing this, he asked me to include the price tag from the car.
 
The file I used for the layout is called License to Drive, and it's from Marjorie Ann Designs.  The car and keychain are both pieced but the boy is clipart that I printed and then cut by hand since my Cricut for whatever reason said it couldn't read the page in order to perform the cut.
 
The stamps on the license plate and key chain are from Cardz TV Stamps and the stamp set is called Planner Basics.

Intergalactic Birthday Wishes

 
Happy Friday everyone and welcome the another Cardz TV 3D challenge.  For the next couple of weeks we are challenging you to create a 3D birthday card.  So get your thinking caps on, but first let me share with you my take on the challenge.
 
For my card I used this cute little Alien Poo from the Poopeez line at SVG Cutting Files.  I absolutely love the characters in this line and have a lot of fun with them. 
 
Now the 3D portion of my card is on the inside, and for this I used the A2 Pop Out Card from Lori Whitlock.  This is a file that you can purchase from the Silhouette Design Store.


My printed papers are all coordinating papers from the Cosmic Whammy mat stack by the Paper Studio.
 
The stamped sentiments are from two different Cardz TV Stamps sets.  On the outside I used Up and Away on the outside of my card.  On the inside I used Good Times.
 
And now that you've seen my take on this week's challenge be sure to check out all the other wonderful designs our team has created for you this week.  Then after you've been amply inspired, create your 3D card, link up and play along with us.  I look forward to seeing what you create.
 
Until then, I'm going to play along in a couple of other challenges myself:
 
SVG Cutting Files - Crafter's Choice - Ends March 14th
 
Die Cuttin Divas - Kid's Theme - Ends February 21st
 
DoubleClick Connections - Happy Birthday - Ends March 1st

Gawrsh - It's Your Birthday

Who doesn't love a good birthday?  Especially when there's a fun, classic character like Goofy dropping in to help you celebrate.

For today's card I used the following Cricut cartridges:

Mickey and Friends for Goofy

Everyday Paper Dolls for the glasses on Goofy

Mickey Font for the Gawrsh sentiment

Tags, Bags, Boxes and More for the tag

And now I'm off to enter my card into the following challenge:

Die Cuttin Divas - Kids' Theme - Ends February 21st


Cat in the Hat Moment

I finally sat down this past weekend and started scrapping in my youngest son's Smash book.  I bought this book with the best of intentions of scrapping his Senior year of high school.  And now that he's graduated I'm finally started to get it done.
 
One of the things we did his Senior year was take a trip to Universal Studios.  This is something we've started doing every other year and really enjoy our time there.  Even though I'm closing in on 50 I enjoy the areas that are designed for the younger kids like Dr. Seuss land.  Our first year there I about cried while watching one of the shows.  Why would I cry you ask?  Because all the memories from when my kids were growing up and how much they loved reading the Dr. Seuss books came flooding back.  And while sitting there, watching the show it was like it all came to life.  As crazy as it sounds it was actually pretty cool for me.
 
But, I digress.  Since this is a Smash book and my son is supposed to come back and journal his memories, doodle, scribble or whatever all over the pages I didn't want to get to entrenched with the "traditional" layout.  Instead I decided to let the picture and a couple of the characters from Marjorie Ann Design's file titled Imagination do the job for me.  Now my son will have plenty of room to journal.

Prince Charming's Conversation Hearts

 
Today I’m going old school.  Pulling out the Cricut cartridges and creating a Valentine themed memory box for my husband.
To create the box I cut:
·         2 pieces of foam core board 9 "x 9" for the top and bottom of the box
·         4 pieces 1" x 8" for the sides of the box
·         1 piece that was 1.25" x 9" to use as the brace for the lid
I then covered the pieces with blue cardstock and on the inside I chose a valentine theme paper to use as my "accent". It was a double-sided print so I used one side for the lid and the other for the bottom of the box.
For the cover of my box I embossed two sheets of white and red paper with the Cuttlebug hearts folder and then created my background square. Prince Charming and Sleeping Beauty were cut at 7" from Happily Ever After. I didn't care for the way the eyes and lips cut so I painted those in and added some red glitter to Beauty's lips.
 
 
For the conversation hearts I cut a fry box from Tags, Bags, Boxes and More.  The hearts on the box are from Doodlecharms.  The large one I cut at 3” and the smaller ones I cut at 1”.
 
 
To make the "conversation hearts" I cut hearts from Happily Ever After.  These were cut at 3" and then inked. To get the verbiage on them I formatted text boxes the size I needed in Word, did a 'test' print and then placed a small amount of tape on the paper, placed the heart accordingly and then printed to add my verbiage. The font I chose is from dafont.com and is called fontdinerdotcom luveable.

And now I'm off to enter my project into the following challenges:

Fantabulous Cricut Challenge - Valentine's Day - Ends February 14th

Bitten by the Bug 2 - Valentine Hearts - Ends February 14th

DL Art - Pink, Red and Hearts - Ends February 24th

Die Cuttin' Divas - Love - Ends February 14th

My First Night Light

 
I'm so excited to share this project with you.  For months I have been watching people post pictures of beautiful projects using glass blocks.  Well, I finally broke down and purchase a couple sets not fully knowing what I would use them for.
 
As you know from reading my post from yesterday our youngest daughter recently found out she was having a little girl.  Since they've already chosen a name I thought I'd go ahead and use my first block to create a night light for her room.
 
I cut this adorable girl bear with her angel doll from the Bubbles the Bear Sweet Dreams file on to some printable vinyl.  Then using one of the system fonts on my computer I cut out Ocean's name.
 
 
Before applying the vinyl to my block I prepared the surface by cleaning it with rubbing alcohol and allowing it to dry.  Once dry I applied the vinyl and then proceeded to spray the block with the first coat of Rust-Oleum brand Frosted Glass spray.  Let dry for 5 - 10 minutes and then apply a second coat.  Next, I sealed everything with one coat of Rust-Oleum brand Clear Matte spray.  Again I let it dry for 5 - 10 minutes.
 
I then added the light - which by the way is supposed to be on the bottom of the block - wrapped the block with ribbon and placed the light on the stand.
 
And there you have it.  My first night light.

There's a Bundle of Joy

Today I'm sharing a card with you that I made for my Grandma to let her know that she's going to be a Great - Grandma again.  This past week our youngest daughter finally announced her pregnancy (only a select few of us have known for a while) along with the baby's gender! 
 
Surprise - it's a girl!
 
For my card I used clip art from the Bubbles the Bear Sweet Dreams file from Marjorie Ann Designs.   The stamped sentiment is from the Lawn Fawn stamp set titled Plus One.  On the inside of the card I stamped the sentiment "on the way!" in pink ink and then stamped little hearts all over.
 
And now I'm off to enter my card into the following challenges:
 
Die Cuttin Divas - February's Sketch - Ends February 7th
 
DL Art  - February Linky Party - Ends February 28th

Valentine Treat Box

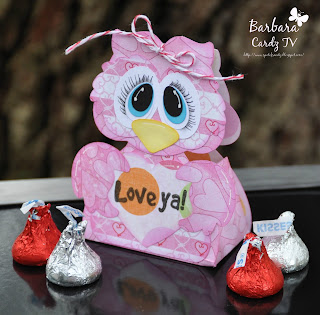
Happy Friday everyone!!  Cardz TV is back with a whole new set of challenges and this week begins the return of our 3D design team.  To kick things off we're creating a 3D treat box (or bag) for Valentine's Day.
 
For my 3D treat box I chose to use the Valentine Owl Box from Treasure Box Designs.  My stamped sentiment is from the Cardz TV Stamps set titled Love Ya.
 
And now that you've seen my creation for this week's challenge be sure to check out the fabulous designs my other team members created just for you.  You can check them out at Cardz TV, and then after you've been amply inspired, created your own 3D treat box or bag.  Link up.  Play along.  It's that easy.
 
You have until noon EST, Thursday, February 18th to add your link here and play along.  Please no backlinks.
 
Mary will chose a winner via random.org and that winner will receive a set of Cardz TV Stamps.
 
Good luck, and I can't wait to see what you create.

Like You a Watt

 
Today I'd like to share a card I made using the Silhouette design Valentine's Love Light Bulb.  It's a PPbN creation and since it's Valentine themed it's on sale right now.
 
This cutie was perfect for pairing up with the sentiments from the Jaded Blossom stamp set titled Watt's Up.  When this set first came out I didn't think I'd really use it so I didn't purchase it.  But then a month later I changed my mind and added it to my stash.
 
Here's how I used the stamps on the inside of my card:
 
 
To finish off my card I added a couple of Pink Sherbet colored skittles from DoubleClick Connections.
 
And now I'm off to enter my card in the following challenge:
 
Double Click Connections - Use a Heart - Ends February 16th

DL Art - Valentines - Ends February 10th

Leinzlove Tear Bears - Color Red - Ends February 28th

Valentine Treat Holders

As we begin to close in on Valentine's Day I thought I'd share some treat holders I put together.  These are a sampling of what I'm giving to those who are participating in our secret pal swap at work.  Everyone knows that I love to craft.  And that means I can't make things for my secret pal.  So instead I make a little something for everyone around different holidays.
 
For this project I started with the Pocket Square Candy Holder from SVG Cutting Files.  Then I used the print and cut feature, and characters from the following Marjorie Ann Designs files I decorate my holders:
 
I then used sentiments from the recently released stamp sets from Jaded Blossom titled: 
 
And now I'm off to enter these treat holders in the following challenges:
 
SVG Cutting Files - Valentine Themed - Ends February 14th

DL Art - Valentines - Ends February 10th