Showing posts with label Thanks 4 the Adventure. Show all posts

It's a Chicken Thing

Chickens and kitchens are a pairing that I've seen around off and on for a long time.  So when I ran across this Hei Hei inspired embroidery sketch from Thanks for the Adventure I had to add it to my stash.

Lately I've been stitching out towels for Christmas.  And those towels have been stitched on a waffle weave style towel.  Well this time I decided to do it all completely different.  This time I stitched out my rooster on a flour sack towel.

Now I'm not sure how I feel about these flour sack towels, but there are people out there who just love them.  Or so I'm told.  😀  So I figured why not.

All in all I do love the way that he stitched out.  The colors of thread I used are not 100% accurate but I used the closest colors I had.  But then isn't that what "inspired" is all about?  Taking the real thing and creating something based on it?  Either way I'm loving how the colors I used pop against each other on that white background.  And maybe next time I'll come up with some clever saying I can add to the design....


Peter Pan Burp Cloth

I'm not gonna lie.  I love Peter Pan.  Not that I'm a fanatic about the cartoon, but I love the story and characters.  And so whenever I get a chance to create a craft that features Peter Pan or one of his companions I jump at it.

(Did you see the lantern or night lights I made last year?)

Today I have another burp cloth that I've made and this time it features the delightfully fun Peter Pan himself.  The Peter Pan sketch is another inspirational design created by Thanks for the Adventure.  Just like all the other designs I've stitched out he stitched beautifully.

Now I just need to decide what I want to stitch on the remaining 10 or so cloths that I need to finish....


Tiana Sketch Baby Dress

It's been a while since I've embroidered on an article of clothing.  I'm still not that comfortable with it as I have difficulty placing clothes on my hoop.  But when it comes to doing these little baby dresses it's not so bad since I can just place the stitching at the bottom of the dress.

And so today I share with you the last of the baby dresses I have on hand.  I had purchased several of these cap sleeve dresses in different sizes, and colors, from Hobby Lobby.   The smaller ones up to about 6 or 9 months were perfect, but I discovered that the one year dresses had an issue with the opening for the head.  I had one I made for my granddaughter that I could not get to fit over her head.  To remedy that I had to cut a slit and create a button hole.  Needless to say, I reached out to corporate about the issue and they said they'd look into it.  Either way I won't be buying anymore of the larger sized dresses.  Too risky.  The shirts they sell though have been wonderful and I will be working with more of those in the near future.

For this dress I found this great sketch of Tiana over at Thanks for the Adventure.  Since I had just made a greeting card with Tiana I thought I'd make a little dress too.  I have always loved how beautifully these sketches stitch out and this one was no exception.

Nightmare Book Pillow


I thought I'd do something a bit different today.  Instead of starting the week by sharing a greeting card I thought I'd share a new embroidery project.  

So today I'm sharing a new book pillow that I made.  Last year I found this great Nightmare Before Christmas fabric at one of my local craft stores.  And, as I so often do I purchased a yard just because I liked it.  I had no project in mind.  Nothing special at all.  I just wanted it.  

The fabric must have sat in a pile for months before I finally used it.  It wasn't until Halloween last year that I was inspired to create a Halloween tree for my husband.  Halloween is his favorite holiday, and so I made a Nightmare Before Christmas themed tree.  And what tree is complete without a tree skirt?  That's right I used a piece of this fabric to make a tree skirt for his Halloween tree.

Once complete I still had plenty of fabric leftover.  So when I saw this sketch of Sally over at Thanks for the Adventure I knew another book pillow was in order.

The verbiage I added using the Comic Strip font from Applique Corner.

Christmas Advent Towel

Hey everyone!  I'm back with another Christmas in July project.  This time it's another kitchen towel.  I found this fun design over at Thanks4The Adventure - where I find so many of my fun designs.  This particular design is called Advent Christmas Tsum Tree.

Right away I am going to admit that I was remiss when I stitched this project.  While my towel turned out looking good it could have looked better.  How you ask?  Well, I forgot to use my WSS (water soluble stabilizer) on top of the towel so that my stitches would not sink.  Personally I like to use Floriani's Wet N Gone but any brand will do really.  (I've used the brand from Joann's with success as well.)

Now I know what you're thinking.....well, if you've followed some of my other posts where I've embroidered towels.  Why would I use WSS on this towel when I've talked about using Heat 'n Gone?  The answer is because this particular towel has an applique for the "base" of the project that would help hold the stitches in place (in my opinion).  And with the Tsum Tsums being a filled stitch I didn't want to have to iron over that much embroidery to remove the topping.

At the end of the day though I suppose it doesn't really matter which stabilizer is used for the topping.  It's really a matter of preference.  Either way though I'm still learning as I go, and trust me when I say there is A LOT to learn.  


Santa, I Know Him

It's time for a Christmas in July project.  Today I'm sharing a Christmas towel and matching ornament that I created.  I found these great waffle weave towels on Amazon for a great price so I decided to purchase a pack to play around with.

For this towel I used the North Pole Santa's Elf sketch from Thanks4theAdventure.  Out of the various companies I've seen offering sketches, Aimee's is by far the best.  I love that her designs look finished and stand out no matter what you're embroidering them on.

When I stitched out my towel I did something different than what I hear others do.  In the different groups I'm in I hear the ladies talk about using a water soluble stabilizer on top of their towels.  But, in a stabilizer class I took the instructor talked about how WSS washes away and after a while the stitches start to drop.   She then went on to say that using a heat removable topping like Floriani's Heat 'n Gone eliminates that issue.  So I've started using Heat 'n Gone on top of my towels.

For my ornament, I did a google search for the ninny muggings quote, found one I liked and traced the image.  While that was cutting, I added a couple drops of green, red and yellow alcohol inks in the ornament and sprayed a couple puffs of compressed air to swirl them around.  I've only made a couple of ornaments like this but they're pretty fun.  Especially since no two are alike.

Belle and Beast Reading Pillow

I thought I would try something new and create a reading (or book) pillow.  I've seen a few of these floating around in one of my Facebook groups and they're pretty awesome.  Especially if you love to read.

There are a couple different blogs I visited that have directions on how to make these.  The Polkadot Chair shared directions for an 18" square pillow. And She's Kinda Crafty shared directions for a 16" square pillow.  Since I'd never made these before I opted to start with the 16" pillow.

This was a good week to try this project too because Joann's has fabric and pillow forms on sale.  I really had no idea what fabrics I would use for my pillows.  I mean, I knew I wanted to make at least one with Harry Potter fabric and I did find some.  But I also found the very last yard available of this gorgeous Beauty and the Beast stained glass fabric.  

Once home it was time to decide what sketch I wanted to embroider on the pocket fabric.  After looking at my options I settled on a sketch of Belle and Beast Reading from Thanks4theAdventure.  The quote is one that I liked so I stitched it out using the Elias font from Applique Corner.  Sadly I did something wrong with my hooping/stabilizer because when the quoted stitched out my fabric puckered.

Overall though I love how this reading pillow turned out.  So much so that I'm thinking after I make my other 16" pillow I'll give the 18" one a try and since it's a larger pillow I'll make the study pillow covers for that one.


That's Just Skippy

I always loved the Disney classic Robin Hood.  That cute little bunny Skippy was just adorable so when I saw an embroidery sketch of him I just had to add him to my stash.  At first I wasn't really sure what I'd stitch him on, but as my love for making baby burp cloths has grown I decided I'd stitch him on one of them.

Skippy Bunny is from Thanks 4 the Adventure, and as with all her designs it stitches out quick and beautifully.  I've seen several others that offer sketch designs but none that are as gorgeous as these.

The fabric is a print that I found at Joann Fabrics called Snuggle Flannel Fabric - Chevron Gray Small.  I've used it for several of my burp cloths now and I just love how each of them have turned out when I use this particular print.  Sadly though this was the last I had of this print so now I'll have to go back this weekend to see if they have more.  

Belle Bust Burp Cloth

Of the different Belle style burp cloths I've made I have to say that the one I'm sharing today is my favorite.  I love the way that she stitched out and the overall look is (in my opinion) just gorgeous.

If you're new to my blog I began my burp cloth making adventure about three or four months ago.  At first I thought about using cloth diapers like I see so many others do, but then I realized my cloths wouldn't be any different.  So I went off in search of a pattern for making my own cloths.  That's when I found this pattern from Simplicity.

Another thing I decided to do to set my cloths apart from others was to use flannel fabrics.  They're soft fabrics and when I add the cotton batting in between the flannel the burp cloth is nice and absorbent.

As for the particulars for this burp cloth, the Belle bust applique is another fabulous design from Thanks For the Adventure.  The fabric is a flannel that I found at Joann's.  It's called Beauty & The Beast Friends.

Mad Hatter Burp Cloth


Well it's another rainy day here in Florida.  Perfect for sitting home, drinking coffee and just playing in the craft room all day.  Sadly, I can't do that and need to go to work instead. 😉

But, before I do that I have a project I would like to share with you today.  It's another burp cloth but have no fear as I will soon be branching out to start on my towels and other items for the Christmas season.

This is another flannel fabric that I found at Joann's.  It's called Blue/Brown Dot.  Pretty original huh?  Hey it works though.  Because this is a basic print many different appliques or sketches would work well.   This time I chose to stitch a sketch of the Mad Hatter.

What I love about this guy is that his sketch includes an autograph.  So it looks like he's signed his own portrait for a fan.  Isn't that a fantastic addition?

Baby Groot Burp Cloth

Today I have a fun embroidery project to share with you.  It's been a while since I've sewn a burp cloth and since I had a couple of them cut out I just picked one, found a design I liked to compliment the fabric and off I went.
 
As you can see the design I chose for this cloth is Baby Groot.  He's from Thanks for the Adventure.
Isn't he a cutie? 
 
I love how this sketch stitched out on the green plaid flannel, and it looks even better in real life.  The best part is that these sketches are always great when you need a quick, last minute gift for someone. 
 
I don't remember how I came across this company but I'm sure glad I did because she does phenomenal work.  Not only that she's the only one I've found that does sketches like this and I absolutely love them as much as the appliques.

Whenever Something Happens....

Even though my craft room areas are a bit torn up and I'm down one computer because I gave it to one of my sons who has just moved out (the youngest is the one in process) I wanted to try doing some embroidery.  Now while my machine can read the designs and tell me what colors to stitch using a thumb drive I have learned that the colors indicated by the designer do not always match up.  For example they could have wanted something in brown that my software has translated to be pink.  Don't ask my why but it happens.  And this is why I had a second computer sitting by my sewing machines.  So I could look at the design and/or stitch charts as needed.
 
Since I don't have that computer I thought I could stitch out a sketch design - no problem.  However, I had to pick something a bit more detailed to try this with.  And while it wasn't terrible, there were a couple of areas that left me scratching my head as I tried to figure out just what the machine was telling me.  So for those areas I ran back into my other craft room where the computer sits, opened my Embrillance software and mock stitched the pattern until I knew what I was stitching.
 
Needless to say, I think I'll wait until my machines are all in one room again before I stitch out another design.
 
I LOVE this one though.  It's from Thanks4theAdventure and is called Why is it When Something Happens.  I recently learned that you can stitch appliques on felt and use them similar to a patch for easier placement on hard to stitch clothes.  Of course this design is not an applique but I wanted to see how it would look and use it as a picture in my new craft room.
 
Now I just need to find a frame.

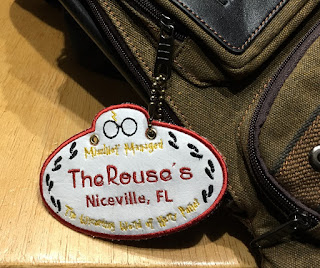
Mischief Managed Luggage Tag

For my final project this week I'm back to the last of my Universal Studios themed projects.  I saved this one for last because it's the tag that we will have placed on our 'backpack' that we'll have on us while we are in the parks. 
 
Recently Aimee over at Thanks4theAdventure has been on a bit of a roll creating different themed stroller tags.  Even though I don't have children in a stroller I just had to have one (or two) so that I could use them on our backpacks.  So while these were originally created to be approximately 8" x 6" I scaled ours down to more of a 5" x 3.5" tag.
 
 
This particular tag is called the Wizarding World of Harry Potter tag.  It's an in the hoop project, meaning the entire project is made in the embroidery hoop.  The tag itself are different pieces of vinyl that are stitched together through out the project to create the final tag. 
 
I've never stitched on vinyl before so for a first attempt it didn't turn out too bad.  Next time I stitch one of these I'll definitely skip the step for creating the "button holes" for hanging.  Instead I'll just use my eyelet punch and add the grommets.
 
And now I'm off to begin my mischief......

Wizard In Training

I have been counting down the days until our annual trip to Universal Studios, and this week I am in the final stretch.  So in celebration I am going to share a couple of different Harry Potter themed projects with you this week.
 
The first one is a baby burp cloth I embroidered using the recently released Wizard in Training file from Thanks4theAdventure.  I so wanted to embroider a tank top that I could wear but several minutes into the stitching something happened and I was unable to save the top.  So instead I traded out for my creating one of my faithful burp cloths.
 
I really like the way this file works with the chevron print on the flannel I chose.  It's a print that I found at Joann Fabrics called Snuggle Flannel Fabric - Chevron Gray Small.  The print is perfect for a variety of projects and chevron prints are all the rage so for this project it's a definite win - win.

Poppy Onesie

Earlier this week I shared a card I made with a cute little troll inspired by Poppy from the movie Trolls.  (If you missed it, you can view the card here.)
 
Today I want to share a onesie with you that I made using a sketch that was also inspired by Poppy from Trolls.  I used another 'sketch' file from Thanks4theAdventure.  This one is called Little Pink Poppie.  I thought she'd be perfect for this last pink onesie I had purchased from Hobby Lobby.  I love that I can run right down the street and pick up blanks so easily, and pink is just one of the several solid colored creepers they have in stock.
 
I love that way that it turned out and was excited to try it on my granddaughter.  Of course momma thinks there's something wrong with me that I'm embroidering all these items that don't have faces as she calls them.  For me it's just a wonderful form of abstract art and I love it.

Tangled Dress

 
Remember the Tangled princess birthday card I shared with you?  Well today I have an infant's cap sleeve dress that I embroidered with the princess and I'd like to share it with you.
 
I embroidered this one using the Rapunzel from Tangled sketch by Thanks4theAdventure.  These sketches are an embroiderer's dream.  Not only do they stitch out beautifully but they stitch out quickly.
 
The dress is one that I picked up at Hobby Lobby.  It's an infant cap sleeve dress and I have purchased in different sizes up to the 12 to 18 month size.  The 3 to 6 and 6 to 12 month were great.  They fit my granddaughter beautifully.  But the 12 to 18 month that I recently purchased and used for her Easter dress did not work as well.  The head hole was too small and I ended up having to cut a slit in the dress and add a hook and eye closure so that she could wear it.  Of course I reached out to Hobby Lobby about the issue and they were gracious in listening and helped me find my lost receipt so I could return the other dresses I had not yet used.
 
But this dress will be a great gift for another little princess...

Princess - Wonderland Burp Cloths

Today I have a set of baby girl burp cloths to share with you.  These were made using the Snuggle Flannel with pink and brown polka dots from Joann Fabrics.  And since it was a pink colored fabric I thought that these two designs would compliment the fabric nicely.
 
For my 'wonderland' burp cloth I used the Alice in Wonderland sketch with autograph.  Don't you just love that autograph?  What a great idea it was to add that to the design.  And for my 'princess' burp cloth I used the Queen Elsa sketch.  Also from Thanks4theAdventure. 
 
 
In all seriousness, I really do love how these sketches stitch out and I think that they are a great, fun alternative to stitching filled designs and/or appliques.  If you do any embroidery and haven't tried these sketch designs yet you're really missing out. 

Buddy Boo Tee

I am very excited to share today's project with you.  Months ago when my hubby surprised me with a new embroidery machine I was determined to learn how to embroider clothes.  We took several free classes to learn about stabilizers, threads, applique and so on.  (Yes, hubby sat in those classes with me.)  We even did a bit of internet research and stumbled upon a product called JT Hoop It Up.

JT Hoop It Up, is an embroidery accessory that assists with embroidering on baby onesies and small children's tee shirts.  Perfect!  Just what I need and we purchased one for my 5x7 and one for my 6x10 frame.  I watched a couple of their videos showing how to use the frame and despite my best attempts I ruined two articles of clothing and said no more.

Until now!  I decided it was time to brave the waters again.  Only this time I wanted to start 'small'.  And now that I've discovered Thanks4thAdventure I can do that with her wonderful sketches.

I pulled out an 18 month sized tee from my stash (blank purchased from Hobby Lobby) and opted to use the Sully's Buddy Boo file from Thanks4theAdventure.  At first I was very nervous and I repositioned and re-adhered my shirt to the JTHoop several times.   Finally I decided it was now or never, lowered the needle and told my machine to start embroidering.

I am excited to report that my shirt stitched out beautifully!  Not even one pucker, and I could not be any happier.  Guess this means I'll be doing more clothes.  😀

Springtime Flour Sack Towels

This past weekend I was determined to begin learning my embroidery software, Embrilliance.  Shortly after purchasing it I learned how to turn my embroidery files into SVGs so that I could cut my fabric for the appliques.  However, I quickly decided that while that was cool, I didn't really like it because I was having difficulty in placing the pieces perfectly for stitching down.  Since then I haven't really played with it much.
 
This weekend I opened the software, determined to learn how to merge files and/or use fonts.  And learn how to use fonts I did.  At first I was upset because I thought I was going to have to open the file for every letter separately.  But then I accidentally learned how to import my fonts and I was so excited!
 
After figuring out how to import fonts it was time to play around with using them.  Using the Snow White sketch from Thanks4theAdventure I found a quote from Snow White that I thought would work for a kitchen towel.  The font I used on this one though was pre-loaded with my software.
 
Then I wanted to play around with this Spring Bonnet Girl applique from Stinkin' Cute Applique.  I was very excited when I saw this applique because Marjorie Ann Designs had recently released this same Spring Bonnet Girl as an SVG file and I absolutely loved her.  Now I can have fun creating little housewarming gifts by combining the two.  (If you haven't seen the card I created you can view it here.)  For this towel, I used the Oceanside font from Applique Corner to stitch out the Bible verse.
 
This was my first time stitching on flour sack towels and I think they both turned out pretty good.  What do you think?

Belle Burp Cloths

 
We are half way there everyone.  After today it's a downhill slide to the weekend.  Until then I'm going to continue with my princess theme for this week.  But today I thought I would change it up a little bit and move from greeting cards to burp cloths.  Remember yesterday when I shared my new baby congratulations card I said that baby girls are our princesses?  Well why not have a princess themed burp cloth or two?
 
When I was shopping for some new flannel fabrics at Joann's a couple weeks ago I came across this gorgeous Beauty and the Beast flannel.  Of course I had to have some and so I bought a couple yards to play with.
 
I thought it would be fun to play with both a sketch and an applique for these.  After searching through the files at Thanks 4 the Adventure I settled on the Little Belle applique, and the Princess Belle sketch.
 
If you've never embroidered a "sketch" design you really should check out the ones that Thanks 4 the Adventure has to offer.  They are so quick and easy, and the possibilities are endless.  So pick out a design or two and give it a try....you'll thank me later.  😉