Happy Friday everyone!! Today I have another challenge for you and this time is all about the face. That's right, our challenge this week was to create a card with a face. And what would be better I ask you than this cut from the new Wild Cards 2 cartridge? Okay, well there are a few and I think our awesome design team has found them all for you so be sure you hop on over to Pause Dream Enjoy to take a look.
As soon as I saw this cut I knew that I had to use it for this week's challenge. Even better I knew exactly who I was going to send this card to.......my oldest daughter. She has these adorable saying that end in "your face" like "hush your face".
This was a very easy card to make since the cartridge does all the work for you. Now I just need to find a little more time so I can sit down and play with this cartridge a bit more.
So this week's sponsor for our challenge is
Fresh Brewed Designs and this week's winner will take home 3 digis of their choice http://freshbreweddesigns.com/ . Now go take a look at all the other great projects our team has put together for you. Then break out those card making tools, create your own and come back here - or go to Pause Dream Enjoy - and link up your creation so you can play along with us AND be entered for a chance to win this week's prize.
I can't wait to see what you create!
Snowman Gift Tags
on Thursday, September 27, 2012
Labels:
Christmas Cheer,
Create a Critter 2
/
Comments: (1)
Well it's almost the end of the week and I don't know about you but I'm ready for the weekend. Of course mine is going to be jam packed as this weekend begins our craft show season. We've only got a couple of shows this year but we've doubled our booth sizes and are already talking about maybe taking on another one next year if we do well again this year.
Today, I'd like to share another set of gift tags I put together. I used the shaving cream and food dye technique again and I just love how the yellows turned out. The marbling and color is so perfect as a backdrop for these adorable snowmen from the Create a Critter 2 cartridge.
Surprise tho' - I did use Christmas Cheer for the "to" and "from" one these tags. Yep, I actually used one of my older cartridges. LOL
These tags were a lot of fun to put together and the hardest (not to mention the messiest) part was the shaving cream technique. As you can see I "dyed" both sides of my tag thus giving them a finished look. Don't remember what the shaving cream technique is? You can view the tutorial here.
Now go have fun and create some gift tags while you still have time.
Soooooo Spooky S-Fold Challenge
on Wednesday, September 26, 2012
Labels:
Create a Critter 2,
Halloween
/
Comments: (4)
Okay, it's not sooooooo spooky, but it is soooooo cute.
Today's challenge is brought to you by Cricut Cardz Challenge where our directive this week was to create an S-Fold card for Halloween using any cartridges and colors we choose.
As you can see I have once again reached for my ever so handy dandy Create a Critter 2 cartridge. For Halloween this year these cuts are the best! Besides I have to admit that these were more of the cuts I had in my stash that I mentioned in yesterday's post.
My papers are from a mat stack that Recollections put out last season and sadly I'm about out of them. I think these have been some of my favorite Halloween themed papers to create with.
But I digress a little. When you open my card it looks like this.....
I had one little ghost left and he was the perfect size to add to the back of the card 'flap'. And the purple paper was just perfect for a ready to go sentiment so I just had to use it. But then I needed a little spot for someone to write their own greeting so I added a small strip of white as well.
And now that you've seen my take on this week's challenge be sure to pop in over at Cardz TV to check out the other great designs our team has to share with you. Then be sure to create your own take on the challenge, link up and play along with us.
I can't wait to see what you create.
By the Glow of the Moon
on Tuesday, September 25, 2012
Labels:
Create a Critter 2,
Sizzix
/
Comments: (1)
Happy Tuesday everyone. I'm back again with another Halloween card to share with you today. This time I'm using a combination of Cricut and Sizzix cuts. When I go through my creative slumps sometimes I'll just sit around and make various cuts and put them into a bucket for later creativity. And since my computer was down over the weekend I pulled cuts from that bucket to create my projects that you'll see through out the week.
Now I know you're probably thinking that this card looks just like one I shared a week or two ago when Cricut did their CAC2 sneek peak - and you're right it is very similar. But there are a couple of variations. For this one I did use the CAC2 cartridge for the house cut. However, the bat and the tree were cut using my Sizzix dies. I absolutely love this spooky tree cut and thought it would be great with the house.
This time I also opted for a less cutesy background paper. For this card I chose one from Pink Paiselee's Hocus Pocus line. Oh and since I did have a ghost cut in my bucket I couldn't go without using it, and did so on the inside of my card.
The font that you see pictured is another of the sentiment downloads that I got from Paper Crafts. They have several great ones to choose from so hurry on over to select one or all for your crafting pleasure today.
It's a Piggie Birthday
on Monday, September 24, 2012
Labels:
Birthday,
Create a Critter 2
/
Comments: (0)
I have been having so much fun with the new Create a Critter 2 cartridge. Today I have a quick and easy birthday card to share with you. It's ridiculous how easy this was to put together but when you have a great cut and cute paper to back it up that's just how it is. LOL
All I did for this one was cut the pig and her balloons, matched it up with the Happy Birthday phrase and viola. How's that for when you need a last minute birthday card?
I just wish I had had this done in time for my sisters' birthday. Problem was I had a virus hit my computer late last week and spent the weekend backing up needed files and rebuilding the system. Oh well at least they know I still love them...
Christmas Card Holder - Altered Project
on Sunday, September 23, 2012
Labels:
Altered Project,
Christmas Cheer,
Christmas Noel,
Create a Critter 2,
Graphically Speaking,
Sizzix,
Teddy Bear Parade
/
Comments: (2)
I've been working on this project for the past week and half and am now ready to share this fun project with you. These card holders were inspired from a Holiday Cards & More magazine published by Papercrafts a couple years ago. I've been searching for the holder so I could make my own and as luck would have it Hobby Lobby delivered a sale email to my inbox that just happened to have them featured!!! You might be able to find them in the store but since the closest one to me is an hour away ordering them online was well worth the shipping costs.
So I started my project with this........
I originally cut this little bear out for one of my caddies but with the antlers he was too tall. So I combined him with this tree cut from one of my Sizzix dies.
So I started my project with this........
And after a couple coats of white acyrlic paint, I had this.....
After the inside and sides were dried, I turned the caddy upside down and painted the underneath. Once that was dry I took them outside and sprayed them down with a sealant to help protect the paint.
The next step was finding the right papers for each of my caddies. Once selected I measured the rectangular sides, cut the needed sizes and then traced the two ends onto the left over paper. In all one 12" x 12" sheet of paper was all that was needed. After inking the edges of the paper I used Scotch quick dry adhesive, I glued my papers in place, carefully trimmed any excess and then lightly sanded all edges.
Now for the fun. Deciding what cuts I want to use to embellish my caddies! I wanted to use cuts that would enhance the papers used. While some were easy choices, others were not as easy as I anticipated.
All caddies of course have the same folder. I cut these from Grapically Speaking and repurposed an actual manilla folder for the job. After cutting the folders I ran each one through the printer and used the Christmas card font from dafont.com.
I then used the following cuts between the four caddies:
Teddy Bear Parade - Elf Teddy Bear (pictured above)
Christmas Solutions - Santa (after several attempts to cut his glasses I gave up)
Create a Critter 2 - Snowman
Christmas Cheer - Candies and Stocking
Oh, and that card you see in my caddy - here it is in full view.
I originally cut this little bear out for one of my caddies but with the antlers he was too tall. So I combined him with this tree cut from one of my Sizzix dies.
I hope you enjoyed seeing my project and if you make some I'd love to see what you did so come back and tell me about it.....
Snowman Tissue Cover
on Wednesday, September 19, 2012
Labels:
Loom Knitting
/
Comments: (0)
Happy Wednesday everyone. This week I'm taking a little break from my papercrafting to do some loom knitting and today I wanted to share one of my projects with you. I created my first one of these earlier in the year - right after I started learning to loom knit. And now that I've been doing it for a while I wanted to try another one but with different yarns to see how he would turn out. Needless to say I LOVE him!
If you're a loom knitter or are thinking about becoming trying your hand at it you can find the pattern here. It was created by Brenda Myers who's also printed a couple of pattern books that you can find at Walmart and other places.
This is my original snowman. Not bad for a newbie's first attempt....
Never Too Early For Christmas
on Friday, September 14, 2012
Labels:
A Quilted Christmas,
Christmas Greeting
/
Comments: (1)
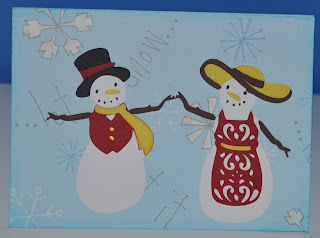
Happy TGIF everyone and welcome to the last of my design team challenges for this week. Today's challenge is from Pause Dream Enjoy and our directive for this week was to create a project using the colors red and yellow.
Well I just had to break out my new Quilted Christmas cartridge and find a cut that would work with this challenge and I do believe I did. I love this little snow couple and I think they rock the reds and yellows beautifully.
So now that you've seen my take on this week's challenge hop on over the PDE and get your inspiration on with all of the other awesome creations our team has created for you this week. Then create your own and link up for a chance to win a prize from this week's sponsor Squiggle Fly with any 3 items from the Squigglefly store http://www.squigglefly.com/ (winner to contact Holly directly).
I look forward to seeing what you create.
Team....
on Thursday, September 13, 2012
Labels:
Accent Essentials,
Encouragement,
Sports Mania
/
Comments: (6)
Today I have another DT challenge for Just A Scrappin' to share with you, and I have to admit that when I saw the directive for this one I was like "are you kidding me?". I had no idea what I was going to do for this one, but in the end it all came together and did so beautifully.
So what was the directive you ask. Well, we had to create a project with Volleyball as the theme. But it didn't stop there - we had to use the colors maroon, white and gold. Now this part wasn't too problematic for me because those are the school colors for our local highschool (from which I graduated). But wait, it didn't stop there either. We also had to use brads on our project.
Think, think, and think some more. Whatever in the world could I do? As I looked through the pages of my Sports Mania booklet I saw this cut with the hands up over the volleyball net and I heard the word "TEAM" yell out in my head. So off to the internet I went in search of a quote for teamwork and from there everything fell in to place.
As I mentioned earlier, the cut with the volleyball net and hands were cut from Sports Mania as was the volleyball. To make the card a little more interesting I placed my volleyball on an action wobble. See?
And that quote I mentioned earlier - it goes like this......
"Team means Together Everyone Achieves More!"
And now that you've seen my card hope on over to Just A Scrappin' and check out the other designs our team put together for your viewing pleasure this week. Then after you've been amply inspired create your own, link up and play along with us. I'd love to see what you create.
Celebrating Heroes Gift Tin
on Wednesday, September 12, 2012
Labels:
Altered Project,
Military appreciation,
Stand and Salute
/
Comments: (2)
Today I'm giving you a two 'fer since I had not had time to post this project earlier this week. I've had several tins sitting on my shelf waiting for me to do something with them for a while now, and so I decided to actually do something.
This was the last of my paint can tins and I opted to turn it into a gift tin for a military hero. My dad is retired from the Air Force and we still live within a few miles of the base so I am surrounded by some awesome men and women - thus my theme choice.
For this tin I used one of the July 4th themed pages from the Tim Holtz seasonal mat stack. I also used cuts from the Stand and Salute cartridge. My flag was cut twice - once flipped so that I could have the crossed flags. And of course I couldn't create a military theme without dog tags so I cut one of those as well. My original intent was to use the cut in conjunction with the flags, but I didn't pay attention to my sizes and it was just too big.
The stickers I used were some that I had leftover after creating some scrapbook pages I did of my Dad's early military career when he was in Vietnam. I was happy to see just how nicely the circle one fit for the top of my can and couldn't have planned it better if I had tried.
Creature Feature Challenge
Labels:
Create a Critter 2,
Halloween,
Wild Card
/
Comments: (3)
Happy Wednesday everyone. This morning I'd like share my DT creature feature card I made for Cricut Cardz Challenge #116. Our directive this week was to create a Halloween themed card using the card feature from any cartridge and colors of our chosing. For my card, I chose the original Wild Card cartridge.
I have looked at this cut many times but never chose to use it before this week, and I'm glad I finally did because I love the way it turned out. To make this card I cut the entire card feature from one of my card blanks. I then made a second cut of the pumpkin portion of the card so that I could layer papers of my chosing. So using papers from a Recollections Halloween mat stack I bought last year I cut my layers for the pumpkin. I then took a scrap piece of yellow paper and layered it between the card feature and pumkin cut to give my pumpkin that yellow candle glowing look for the eyes and mouth. And finally I took yet another sheet from the same mat stack and cut it down strategically to have some little hooligans peeking out through the blades of grass.
As for the little ghost floating around, he's from the Create a Critter 2 cartridge.
And now that you've seen my card for this week's challenge take a moment to pop in over at Cardz TV and check out all the other fabulous creations our team made this week. I promise you will not be disappointed. Then create your own card, link up and play along with us.
I look forward to seeing what creature feature you create.
Squirreling Acorns
on Saturday, September 8, 2012
Labels:
Accent Essentials,
Create a Critter 2
/
Comments: (0)
I love Saturday mornings. Even though it's my day off I still wake up early and everyone else generally stays in bed for a couple of hours giving me time to enjoy a cup or two of coffee and some quite crafting time. This morning I was able to get a couple of cards put together for upcoming challenges.
In the meantime, I wanted to share with you another project I created for the Create a Critter 2 sneak peek contest Cricut was running last week. There were a lot of awesome projects entered into the contest and they're supposed to announce the winner/s on Monday and I can't wait to see who's picked.
This project is a Fall home decor project and because of the mat size with this frame I created my picture just like I would for a card. The opening measures 5 x 7 so I of course started with a background piece of cardstock on which to build my picture.
Using a paper trimmer, I cut two rectangles - brown 4 x 3 1/2" and red 3 3/4 x 3 1/4" and then two squares brown 3 1/2" and green 3 1/4". The red and green squares I embossed using the swiss dots folder and inked all edges.
From Accent Essentials I cut what started as a scalloped circle but ended up as a scalloped rectangle. I made two different sized cuts so that one would mat the other while allowing enough room for my squirrel to be framed.
From Create a Critter 2 I cut the pilgrim squirrel at 2" and three acorns at 1". While putting the picture together I decided to see if I had wiggle eyes that would 'fit' the squirrel's face while adding to the cute factor, and I think these were successful.
Other than that it was placing the picture in the mat, putting on the back and standing my new picture up on the table for display.
Wild Thing
on Friday, September 7, 2012
Labels:
Create a Critter 2,
Tags Bags Boxes and More
/
Comments: (0)
Happy Friday everyone! I have a quick and easy card to share with you today. And yes, it is yet another Create a Critter 2 creation.
For this one I used that adorable lion that was available during the sneak peek week. I cut him out at 2 1/2". I also used Tags, Bags, Boxes and More for the tag, cutting two - one at 2" and one at 1 3/4". (Looking back I do wish that I had used a larger font, but that's okay.) After adhering the two tags together I added a piece of scrap ribbon.
My background paper is from DCWV's Animal Crackers and the brown strip is a piece of corrugated cardstock that I had in my stash.
Then on the inside I added the following sentiment, "If I was stranded on a desert island and could only take one thing, it'd be you."
See, told you it was easy.
The Haunting Hours
on Thursday, September 6, 2012
Labels:
Create a Critter 2,
Halloween,
Happy Hauntings
/
Comments: (2)
Today I'd like to share with you another project that I had created for the Create a Critter 2 sneak peek contest. I just love these cutesy halloween cuts and could not resist cutting several of them while they were available this past week.
For this card I cut the house at 6" and the ghosts at 1 1/2" and 1 1/4". I also used Happy Hauntings for the bat (cut at .75") and the tree (cut at 3 3/4").
As I was laying my cuts out for the card the tree didn't really go as tall as I wanted for the overlapping of the branches so I hand cut a piece of the brown cardstock that I could use to add height and yet hide behind the house cut so you wouldn't know what I had done. The end result was just as I wanted.
I've been having so much fun with this cartridge and can't wait to see it hit the shelves in my area. Stay tuned because I have more to share with you later........
Christmas Joy Tags
on Monday, September 3, 2012
Labels:
Christmas Greeting,
Create a Critter 2
/
Comments: (1)
I was so excited last night to discover that I could now see and use the Create a Critter 2 sneak peek! Needless to say, I made my husband a craft widow because I decided that it was time to get cracking and just make a bunch of cuts while the cutting was good. So I set to work just placing a bunch of cuts at different sizes on my mat. Cut, bag and start again. I had no set project in mind as I cut on my merry way but I knew that I wanted them - after all they're free. LOL
Well today, I decided to use these cute little birds and make some tags with them. I also decided that now was as good a time as any to give that shaving cream technique I heard about a long time ago a try. So off to Splitcoaststampers I went in search of the tutorial. Talk about a fun tutorial! Now I won't lie and tell you that I didn't make a mess - even my husband chimed in to let me know I was making a big one. But that was okay because I was having fun. Have you tried this technique yet? If not you should.
My cuts for these tags were made at 2" for the bird and 1" for the Joy phrase. After the tags were dried and flattened I found a coordinating paper from My Mind's Eye, tore it to size, inked the edges and glued each strip on about the center of my tag. I then adhered the phrase to the bottom of the tag and the bird about center on the strip.
Oh what fun this project was. Now I'm really going to have to sit down and see what else I can come up with for these cuts I made.
Btw, I published the project in the Cricut project center if you're interested. Not to mention that I wanted to try my hand at that contest they have going on right now. There's a lot of great talent out there so I don't expect to place but it's always fun trying........
Pages
About Me
- Blue6366
- I am a mom to 6 wonderful children and wife to an amazing husband. In my spare time I love to craft, workout and participate in any mud/fun run I can find.
Blog Archive
-
▼
2012
(144)
-
▼
September
(15)
- Miss Your Face
- Snowman Gift Tags
- Soooooo Spooky S-Fold Challenge
- By the Glow of the Moon
- It's a Piggie Birthday
- Christmas Card Holder - Altered Project
- Snowman Tissue Cover
- Never Too Early For Christmas
- Team....
- Celebrating Heroes Gift Tin
- Creature Feature Challenge
- Squirreling Acorns
- Wild Thing
- The Haunting Hours
- Christmas Joy Tags
-
▼
September
(15)
Search My Blog
Follow Me On Facebook
Followers
Labels
- 3 Birds (8)
- 9 Months (1)
- A Child's Year (46)
- A Quilted Christmas (2)
- Accent Essentials (54)
- Alcohol Ink (9)
- Altered Project (111)
- Animal Kingdom (15)
- Apex Cuttable Designs (25)
- Applique Corner (17)
- Appliques With Character (5)
- April Showers (6)
- Autumn Celebrations (7)
- Baby (46)
- Baby Steps (14)
- Back to School (15)
- Batman (2)
- Billionaire (4)
- Birthday (101)
- Block Party (5)
- Blog Award (2)
- Camp Out (12)
- Campin Critters (10)
- Car Decals (3)
- Cardz TV Stamps (151)
- Cars (4)
- CD Calendar (9)
- Children Around the World (1)
- Chore Chart (2)
- Christmas (41)
- Christmas Cheer (26)
- Christmas Greeting (121)
- Christmas Noel (24)
- Congratulations (3)
- Craftin Desert Divas (88)
- Create a Critter (35)
- Create a Critter 2 (17)
- Creative Cuttables (1)
- Cricut Chirp (5)
- Cricut Craft Room Basics (3)
- Cricut Decals (1)
- Cricut Essentials (3)
- Cricut Sampler (2)
- crochet (7)
- Cuddly Cute Designs (2)
- Cuttlebug (21)
- Design Studio (8)
- Designer's Calendar (18)
- Designs on Cloud 9 (1)
- Dinosaur Tracks (2)
- Disney Classics (1)
- Doodlecharms (23)
- Easter (30)
- Embroidery (53)
- Embroidery Garden (1)
- Encouragement (35)
- Etsy (1)
- Every Day Paper Dolls (20)
- Everyday Pop Up Cards (11)
- Father's Day (22)
- Foam Core Board (5)
- Forever Young (3)
- Fresh Squeezed Stamps (5)
- Freshly Picked (2)
- Friendship (42)
- From My Kitchen (18)
- Frozen (1)
- George (68)
- Get Well (17)
- Girl's Makeup Party (2)
- Going Places (15)
- Graduation (15)
- Graphically Speaking (56)
- Gypsy Font (5)
- Gypsy Wanderings (10)
- H2O (1)
- Halloween (82)
- Handyman (6)
- Happily Ever After (9)
- Happy Graduation (3)
- Happy Hauntings (16)
- Harry Potter (29)
- Heat Transfer Vinyl (2)
- Hello Kitty (17)
- Home Decor (23)
- Hoop Momma Designs (1)
- HTV (15)
- Hungry JPEG (1)
- Indie Art (12)
- Iron-On Vinyl (1)
- Jaded Blossom (148)
- Jolly Holidays (11)
- Joys of the Season (18)
- Just Because Cards (4)
- Just a Note (3)
- Just Because (19)
- Kadoodle Bug Designs (20)
- Kate's ABCs (1)
- Krafty Nook (3)
- Lawn Fawn (5)
- Layout (46)
- Life's a Beach (16)
- Life's a Party (8)
- Little Scraps of Heaven (14)
- Locker Talk (19)
- Loom Knitting (47)
- Love (25)
- Love You a Latte (6)
- Making the Grade (9)
- Marjorie Ann Designs (201)
- Masculine (24)
- Maymay Made It (5)
- Mickey and Friends (24)
- Mickey Font (6)
- Military appreciation (6)
- Mini Monsters (11)
- Miss Kate Cuttables (2)
- Mother's Day (17)
- My Craft Spot (17)
- My Scrap Chick (12)
- New Arrival (15)
- Night Light (4)
- Old West (10)
- ornaments (24)
- Outdoor Man (1)
- Paper Doll Dress Up (45)
- Paper Pups (21)
- Peachy Keen Stamps (12)
- Plantin Schoolbook (8)
- plastic canvas (38)
- Pooh and Friends (22)
- Pooh Font (8)
- poopeez (1)
- Pop Up (10)
- PPBN (1)
- Pretty Cute Stamps (2)
- Pretty Paper Pretty Ribbon (3)
- Princess (6)
- Puns (8)
- recipe page (20)
- Robotz (9)
- Rock Princess (8)
- Santa's Village (1)
- Scappin Bugs (1)
- Scrappy Moms (3)
- Seasonal Characters (7)
- Sesame Street Friends (16)
- sewing (13)
- Shadowbox (7)
- Shaker Card (5)
- Silhouette (83)
- Simply Charmed (13)
- Simply Scarecrow (2)
- Sizzix (43)
- Skittles (96)
- Snow Day (2)
- Southwest (3)
- Space Party (2)
- Speaking of Winter (8)
- Spongebob (4)
- Sports Mania (9)
- Stand and Salute (12)
- Stinkin Cute Applique (15)
- Stretch Your Imagination (26)
- Suburbia (4)
- Summer Celebrations (2)
- SVG (4)
- SVG Cuts (18)
- SVG Cutting Files (71)
- SVG File Designs (1)
- Sweet Treats (8)
- Sweethearts (13)
- Sympathy (6)
- Tags Bags Boxes and More (23)
- Tags Bags Boxes and More 2 (5)
- Team Spirit (1)
- Teddy Bear Parade (11)
- Thank you (25)
- Thanks 4 the Adventure (23)
- Thanksgiving (29)
- The Vinyl Corner (2)
- Tinkerbell (7)
- Too Cute by Jessica (46)
- Toy Story (2)
- Track and Field (3)
- Treasure Box Designs (29)
- Tutorial (5)
- Unity Stamp Company (1)
- Upcycled Sweater Craft (3)
- Valentine's (55)
- Villain (6)
- Wild Card (13)
- Wild Card 2 (7)
- Winter Frolic (6)
- Winter Woodland (15)
- Wonderland (1)
- Word Builders Garden of Words (4)
- Zooballoo (18)
Powered by Blogger.