Jurassic Zookeeper

Today I'm going back a couple of years to when I first started using Marjorie Ann Designs for my layouts.  Granted I don't tend to create a lot of layouts, but as I've been moving and setting up my new craft room I've realized that I need to start doing more.  I have so many pictures of our trips to Universal and even more importantly our precious Granddaughter.  So getting ready because they're coming.
 
In the meantime though, this layout is one that I made a couple years ago using the When I Grow Up Zookeeper file.  Even though my pictures are from Jurassic park there were elements that I was able to tie in using this file.  For example the jeep and the tree.  And that's the beauty of files like this, you don't have to use every piece of the file - just those that work for what you need. 
 
Even my background paper was instrumental in tying it all together.  This is a page from the Kidosaurus stack from DCWV.  All those bones printed on the page worked perfectly to tie in with the picture we took of the dinosaur fossil along the path in Jurassic Park....


Dreaming of a White Christmas

Since I'm still putting my craft room back together I thought I'd spend the rest of this week sharing some gems that I found while unpacking.  For example, today's Christmas card.
 
I originally made this card back in 2008 and loved it so much that I couldn't part with it.  I even inked the inside edges of the card and added a pooh snowman on the inside.  I made this card using the Pooh and Friends cartridge from Cricut.  Back then this was one of my favorite cartridges.
 
 
In 2010 I gave this card a bit of a facelift by inking the edges and adding some snowflake buttons before placing it in a picture frame for display.  I think this is the one item that I have made and held on to the longest.
 
To this day I love this little card, but now I think it's time to share and allow someone else to enjoy it this holiday season.


Ollivanders Wand Holder

I made the move into my new craft room this weekend and what a whirlwind of a move it was.  And now that the move is complete I can begin the decorating.  However, it won't be complete for a couple of weeks as I wait for things I've ordered to come in, or have the time to finish making the items I need for my décor.
 
Today I want to share with you one of the items that I just completed (with hubby's help).  For the past couple of days I've been working on creating a wand holder for some of the wands we've started collecting.  What I love about this one is that I can still add another one or two plaques to it as we collect more.
 
To make this holder, I started with some pine "innkeeper" plaques I found at Michaels.  These are 9" x 19" and perfect for the wands.  I stained this with some leftover oak stain that I had on hand.  After that dried I came back and dry brushed around the top outer edge with a dark brown paint.
 
The Ollivander's logo was from a file that was shared in one of my FB groups.  The verbiage for the wand descriptions were done using the Modern Fraktur font.  The wand owner's names were done using the Vinque font.  Both from dafont dot com.  I cut the logo and verbiage out of Oracle 651 vinyl and adhered it directly to my plaques.  I then sealed each plaque with a clear laquer spray paint.
 
After the plaques were dry my wonderful husband drilled out the spots for placing the brackets and plaque hangers.  For the wand brackets we used 3/4" brass shoulder hooks which we purchased from Lowes.  As we decided our placement for the brackets we decided to go outside the box and place them so that our wands would have a little slant here and there instead of being perfectly straight across.

Owl Post

Today I'm sharing a fun, magical card with you.  I made this one using the Harry Potter file from Treasure Box Designs.
 
My background was made using scraps of my 9 3/4 print papers that I found in my stash.  The grey paper I distressed using my Tim Holtz paper distresser.
 
Then using stamps from the My Favorite Wizard stamp set by Jaded Blossom, I stamped my sentiment and added a little lightning bolt to my owl.  I also used this same stamp set for the inside of my card.


And now I'm off to enter my card into the following challenge:
 
Hiding in My Craft Room - Masculine - Ends May 27th

Magical Theory and Potions

 
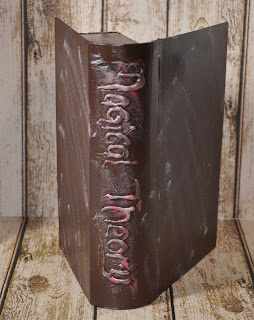
I sat down on Sunday and played around with making another floating book 'shelf' for my craft room and added a couple of extra potion bottles as well.  This time instead of just painting the bottles (this time purchased from Michaels so I'd have a bit of variety in style) I wanted to fill them with potions.  I wasn't entirely sure what I was going to do but I did know that I wanted one of them to be Gillyweed.

After searching around on Pintrest I found a great idea for using a product called Enviro Tex Lite.  You mix it up, pour it into your bottles and it sets us to be a solid product so there's no risk of spills or ick.  For my Gillyweed I put a piece of a plastic plant into my bottle.  Since I didn't have tiny pebbles I tried using skittles but as the resin mix did its thing my skittles lost their color and blended in.  The Veritaserum bottle was created using more of the EnviroTex Lite mixed with a couple different colors of food coloring.  I'd add one color, swirl, let sit for a moment then add the next color and repeat.  If you look closely the resin mix set up so that it appears there is potion mix running down the bottle.  Finally, my Mandrake Root potion is filled with a bit of Spanish Moss.
 
As for my book, it's a paper mache book box that I found at Hobby Lobby.  Online they only sell it in a set but in the store I found the books individually.  In my first post on making these I provided a link to the video that explains how to make these.  Below is a condensed step by step version.
 
1.  For the book title, hand write the name and then using a hot glue gun trace over what you have written.


2.  Along the inside of the book where the pages are you will need to fill in that space with some type of wood.  I opted for balsa wood because it's thin and easy to work with.  The type I purchased gave an almost perfect size for the medium box I purchased and required 6 sheets.


3.  Using a dark brown paint as you base, paint two coats of paint on the outside AND inside of your box.

4.  After the brown paint is dry, using a white and another color of your choosing (I used a metallic red) dry brush over the brown to add some color.


5.  Finally, apply a sealer to the inside and outside of your box.  I believe in the video she used a mod podge; however I opted for using a laquer spray sealant.

This is such a fun and easy project that's perfect for any Harry Potter fan to create.

Whenever Something Happens....

Even though my craft room areas are a bit torn up and I'm down one computer because I gave it to one of my sons who has just moved out (the youngest is the one in process) I wanted to try doing some embroidery.  Now while my machine can read the designs and tell me what colors to stitch using a thumb drive I have learned that the colors indicated by the designer do not always match up.  For example they could have wanted something in brown that my software has translated to be pink.  Don't ask my why but it happens.  And this is why I had a second computer sitting by my sewing machines.  So I could look at the design and/or stitch charts as needed.
 
Since I don't have that computer I thought I could stitch out a sketch design - no problem.  However, I had to pick something a bit more detailed to try this with.  And while it wasn't terrible, there were a couple of areas that left me scratching my head as I tried to figure out just what the machine was telling me.  So for those areas I ran back into my other craft room where the computer sits, opened my Embrillance software and mock stitched the pattern until I knew what I was stitching.
 
Needless to say, I think I'll wait until my machines are all in one room again before I stitch out another design.
 
I LOVE this one though.  It's from Thanks4theAdventure and is called Why is it When Something Happens.  I recently learned that you can stitch appliques on felt and use them similar to a patch for easier placement on hard to stitch clothes.  Of course this design is not an applique but I wanted to see how it would look and use it as a picture in my new craft room.
 
Now I just need to find a frame.

Fishing Father's Day

I hope that all of you had a fabulous weekend like I did.  Saturday morning I ran my last mud run for a while (doctor recommended), but I was blessed to finish like I started - running with one of my children.  Sunday started as a very wet and rainy day with thunderstorms so I spent most of the day crafting and catching up on housework......when I wasn't painting in my new craft room.  Now I know what you're thinking, why would I paint when it's raining because it'll take longer to dry.  Well, my painting was really more of a sponging.  You see I'm changing the accent wall in the room into a faux brick wall.  After 2 1/2 hours layer one is complete.
 
So while I was working on that I was painting another floating book shelf for my room which I'll share later along with some other goodies.  Today though I have a Father's Day card to share with you.
 
This is a card that I made for my dad who loves to fish.  I made this one using the Fishing With Dad file from Marjorie Ann Designs.  I had some fun with this file last year too when I made a shaker card that you can find here.  If you have a fisherman in your life this is a must have file.
 
The stamped sentiment on my card is from the Cardz TV Stamps set titled You're the Man.
 
And now I'm off to enter my card into the following challenge:
 
Hiding in My Craft Room - Masculine - Ends May 27th

Sale Sign

What do you do when you have merchandise that you want to move out?  You have a sale right?  During craft show season this can be a bit tricky.  How do you let your customers know that you have one going on?  Well you post a sign - or two of course.
 
See when I do most of my craft shows it's not just me in the booth.  My mom, sister and I will buy two or three slots and we'll set up together.  The pro to this is that it helps to really draw in a crowd for us because of the variety of merchandise we can offer.  They crochet  and paint.  I papercraft, loom knit, sew and embroider.  The con is that our booth can seem very disorganized in that we do not tend to create multiples of items but rather one of a kinds. 
 
A while back work was getting rid of all these small sign holders, and since the office manager knows I craft she figured I could use them.  I went through the stack and took several of the ones that were in the best shape.  Not knowing what I'd actually use them for I set them on the shelf.  A couple months later I came across this Sale It design from Cuttable Designs and knew it would be perfect.  After all our area is know as the World's Luckiest Fishing Village.
 
In my stash I had scraps of this great water paper that I used as my sign insert.  I then cut the sale design from Oracle 651 and applied it to the front of the acrylic holder. 
 
Now I have a sign that's perfect for grabbing the attention of our customers.

Floating Wall Shelf

Today I'm sharing another fun project I created for my new craft room.  Right now it doesn't look like much but once I decorate my room it's going to be a wall shelf.
I first came across this idea in one of my Facebook groups when another member was sharing how she decked out her bathroom in a Harry Potter theme.  So many members loved her floating shelves and wanted to know how they were made so a short video was created and shared here.
 
In a nutshell, you start out with a paper mache book which can be found at Michaels or Hobby Lobby.  The ones at Michaels are a bit fancier like the one used in the video but since I was at Hobby Lobby for other items that's where I purchased mine.  After handwriting the name of my book on the spine I traced back over it with hot glue.  I even added a couple of skeleton buttons that I had in my stash for a little extra effect.
 
On the 'inside' of the book where the pages are located you will need to glue a strip of thin wood like balsa wood so that it fills in the gap between the pages and the outer edge.  This is where you are going to insert the nails or screws for hanging your book to the wall.
 
As the glue dried I gathered my paints.  I used a burnt umber for the base coat, covering the entire box inside and out.  After the first coat dried, a second one was applied.  After the second coat dried, I came back and dry brushed over the outside of the box with a white paint.  I then used a bright red metallic paint for a second dry brush to help mute the white.  Once the paint was dry I sealed the box with a spray laquer I had on hand, but mod podge or another sealant can also be used.
 
Pretty neat huh?  Now I just need to make a couple more.


Cabana Bay Layout

 
My crafting will be a bit sparse over the next couple of weeks as I begin to pack up my room to prepare for my move.  One of my boys is moving out and so I'll be moving into his old room and moving my remaining son into mine.  The remaining son is seldom home anymore and is planning to move to Tallahassee soon so I figured there wasn't much point in waiting.  Instead I'll begin the shifting this week and in so doing that means there's some work I'll be doing in my "new" room before I complete the move in.
 
In the meantime though I sat down and pulled out pictures from our trip to Universal Studios which I'll be scrapbooking.  Yesterday was the first layout of the hotel in which we stayed on-site.  If you like things that are retro, you'll love Cabana Bay.  Everything from the décor to the music that plays throughout the resort, to the videos that play on the TV in the food court area is all from the 50's and 60's era.  The best thing is once you park, you don't have to leave property.  Everything you need is there - including a shuttle to take you back and forth to the parks.  Our first stay with them was last year and it's where we'll continue to stay because we love it so much.
 
Since the hotel is retro 50's/60's style I decided to use the 50's Diner set from Marjorie Ann Designs.  Instead of using all the words that came for the license plate and sign I opted to use stamp in those areas. 
 
On the license plate and the heart of my sign I used the Teenage Dream stamp set from Craftin Desert Divas.
 
On the main sign, under Nifty, I used the Picture That stamp set from Craftin Desert Divas.
 
I have some more pictures from Cabana Bay to scrapbook so you'll get to see a bit more later.
 
On the bottom of the sign I used Magical Memories from Jaded Blossom.

Slytherin's Secret Potions


Since I didn't babysit my granddaughter last night I had some extra time to play in my craft room last night.  So  I took the opportunity to begin making the first of what will be many items to come for my new craft room.  You see, my two youngest boys are in process of moving out of the house and that means a free, larger room that I can take over for my craft room.  And with that means a new décor - Harry Potter themed of course.  😀
 
This project was inspired by one I saw at Over the Big Moon.  There were two posts that together made for a great potions set.  One offered free potion labels to print (which is where a couple of mine came from - others I found doing searches for them specifically), and the other was for the potions book.  Using her inspiration, here's how I created my project......
 

For the potions book, I used book I purchased from the Dollar Tree.  That way I wouldn't feel bad about cutting it up.  Measuring the cover, I cut an opening in the center of the cover using an Exacto knife.  I then used the knife to scrape around the edges of the opening to rough it up a bit.  I also sanded over the cover (front and back) to rough it up and to remove the indention of the book title from the spine.  Once satisfied with the roughness, I mixed together Ivy Green and White craft paints and with a sponge painted over the cover. 
 
While the paint dried I found a picture of Professor Snapes, printed it and then laminated it.  This would later be taped to the inside cover of the book.  I cut the book title out in vinyl and applied.  No one really knows the "exact" date that Hogwarts was founded but what everyone does seem to agree on is that it was "around" 990 AD. Some use that date and others I've seen using 993 - so I went with 993 for my book date.
 
The potion bottles were various apothecary bottles I picked up at Hobby Lobby - although you could use bottles from around the home.  Before I painted my bottles I tried roughing them up using sandpaper.  However, that wasn't working too well so I decided to try dragging them gently across my brick pavers which worked beautifully. 
 
After roughing up the bottles I painted them with different mediums.  The blue and white bottles were painted with Tim Holtz Distress Crackle Paint.  I also used a clear crackle paint on my Dragon's Blood bottle and then used red alcohol ink on the inside.  The brown bottle I painted using a dark brown paint mixed with a dab of water.  After applying the paint I immediately began wiping it away with a paper towel.  Once dried I came back with a gray paint (didn't have black on hand) and splatter it haphazardly around the bottle.  For my Floo Powder jar I used Krylon Glitter Blast spray paint in Diamond Dust.
 
After printing and cutting out my labels I distressed the edges with my Tim Holtz paper distresser.  I then wrinkled each one up and inked over them with Tea dye Distress Ink (Dragon's Blood I did with Fired Brick).  I then ran the labels through my Xyron and applied them to the bottles.  I then sprayed the bottles with a laquer spray paint to seal.
 
Right now only two of the bottles have "ingredients".  The Floo Powder I filled with a glow in the dark glitter and for the slug repellent I used a mixture of purple/silver glitter with a brown flock.  I haven't decided what, if anything, I'll use in my other bottles.  Since they are not as transparent I may just leave them as they are. 

Mischief Managed Luggage Tag

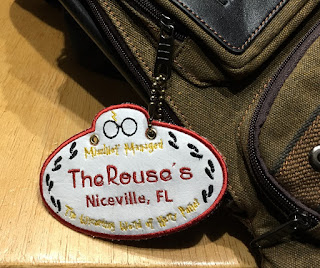
For my final project this week I'm back to the last of my Universal Studios themed projects.  I saved this one for last because it's the tag that we will have placed on our 'backpack' that we'll have on us while we are in the parks. 
 
Recently Aimee over at Thanks4theAdventure has been on a bit of a roll creating different themed stroller tags.  Even though I don't have children in a stroller I just had to have one (or two) so that I could use them on our backpacks.  So while these were originally created to be approximately 8" x 6" I scaled ours down to more of a 5" x 3.5" tag.
 
 
This particular tag is called the Wizarding World of Harry Potter tag.  It's an in the hoop project, meaning the entire project is made in the embroidery hoop.  The tag itself are different pieces of vinyl that are stitched together through out the project to create the final tag. 
 
I've never stitched on vinyl before so for a first attempt it didn't turn out too bad.  Next time I stitch one of these I'll definitely skip the step for creating the "button holes" for hanging.  Instead I'll just use my eyelet punch and add the grommets.
 
And now I'm off to begin my mischief......

Mario Burp Cloth

My boys are hug gamers.  Some of them like those first person shoot 'em ups.  Some of them like more of what I call the traditional games like Mario.  So when I found this Mario themed flannel print fabric at Joann's I had to buy it. 
 
It's a fun print and I was fortunate enough to come across a Mario head applique that was perfect for it.  This one is from Appliques With Character and the file is called Mario Face.
 
I really love how this cloth turned out as Mario's face pops beautifully against the background fabric.  What a perfect gift this will be for someone who loves those Nintendo video games.
 
As for me, it just feels like I'm creating pieces of artwork.

Monogrammed Beach Hat

Before I begin today's post let me just say - I hate monograms.  I don't know why, but I am personally not a fan.
 
With that said, my daughter came to me last week and asked me to monogram my granddaughter's beach hat.  Of course I had to do it.  It was for my granddaughter. 
 
My daughter brought the hat and for a few days it sat off to the side, waiting for me to get in the mood to set up my machine for a monogram.  And then I remembered, I didn't own a single font for use with monogramming.  Sure I had couple of fonts, but as I have learned there's a difference in plain 'ol fonts and monogram fonts.
 
So off I went in search of a good monogram font.  That's when I came across the Interlaced Monogram font over at Applique Corner.  I thought it was a pretty font and would be good for use on the beach hat so I purchased it and off I went.
 
Everything was quick and easy to set up, and it stitched out fine.  I had a bit of puckering which I hate but we'll chalk this one up to a learning experience.  My daughter loved it and that's what counts in the end.  And I have a feeling this won't be the last of my monogram's.
 
Monogram - 1
 
Me - 0

Universal Tip Pockets

Today I'm sharing a small of set of tip pockets I made for use at the hotel we'll be staying during our trip to Universal Studios. 
 
I started with the Tip Pocket file from SVG Cutting Files.  But since we are going to Universal Studios I wanted theme to have characters from some of the different attractions in the parks rather than the icons that come with this file. 
 
For the different characters I used files that were shared in a couple of my FB groups (Cornish pixies and Grinch hand).  I also used the Imagination file from Marjorie Ann Designs for Thing 1 and the Alien Fighters file for the alien.
 
The stamped sentiment is from the stamp set Simply Said from Craftin Desert Divas.

Wizard In Training

I have been counting down the days until our annual trip to Universal Studios, and this week I am in the final stretch.  So in celebration I am going to share a couple of different Harry Potter themed projects with you this week.
 
The first one is a baby burp cloth I embroidered using the recently released Wizard in Training file from Thanks4theAdventure.  I so wanted to embroider a tank top that I could wear but several minutes into the stitching something happened and I was unable to save the top.  So instead I traded out for my creating one of my faithful burp cloths.
 
I really like the way this file works with the chevron print on the flannel I chose.  It's a print that I found at Joann Fabrics called Snuggle Flannel Fabric - Chevron Gray Small.  The print is perfect for a variety of projects and chevron prints are all the rage so for this project it's a definite win - win.